Dialogs are an integral part of user interface design. We use them all the time. We find dialogs everywhere, in many shapes and sizes. In this article we will cover the following dialog types:
- wx.BusyInfo
- wx.ColourDialog
- CubeColourDialog (AGW)
- wx.DirDialog and MultiDirDialog (AGW)
- wx.FileDialog
- wx.FontDialog
- wx.MessageDialog
That’s a lot of dialogs, but there’s still eight more in the wxPython demo. We’ll look at those next time. For now, let’s take a look at this list!
wx.BusyInfo – Letting the User Know You’re Busy
The BusyInfo dialog is not well known. For some reason, it doesn’t even have a demo in the wxPython Demo application. So for your viewing pleasure, we will create one now.
import time
import wx

########################################################################
class MyForm(wx.Frame):

    #----------------------------------------------------------------------
    def __init__(self):
        wx.Frame.__init__(self, None, wx.ID_ANY,
                          "BusyDialog Tutorial")
        panel = wx.Panel(self, wx.ID_ANY)

        busyBtn = wx.Button(panel, label="Show Busy Dialog")
        busyBtn.Bind(wx.EVT_BUTTON, self.onBusy)

        sizer = wx.BoxSizer(wx.VERTICAL)
        sizer.Add(busyBtn, 0, wx.ALL|wx.CENTER, 5)
        panel.SetSizer(sizer)

    #----------------------------------------------------------------------
    def onBusy(self, event):
        self.Hide()
        msg = "Please wait while we process your request..."
        busyDlg = wx.BusyInfo(msg)
        time.sleep(5)
        busyDlg = None
        self.Show()

# Run the program
if __name__ == "__main__":
    app = wx.App(False)
    frame = MyForm()
    frame.Show()
    app.MainLoop()
Fortunately, the BusyInfo dialog is also one of the easiest dialogs to create. All you need to do is instantiate it with a string. Instead of destroying it, the common method of closing this dialog is to just set the instance to None. It’s kind of weird, but it works just fine. You can also Destroy it if need be, but I’ve never needed to nor seen an example of anyone else doing so.
Choosing Colors with wx.ColourDialog and CubeColourDialog
You get two color chooser dialogs with your wxPython distribution. The first one that we’ll look at is the native dialog, wx.ColourDialog. Here’s a screenshot of what wx.ColourDialog looks like on Windows XP:
For this example, we’ll create a simple two-button form that can open both types of color dialogs. Let’s take a look at it:
import wx
import wx.lib.agw.cubecolourdialog as CCD

########################################################################
class MyForm(wx.Frame):

    #----------------------------------------------------------------------
    def __init__(self):
        wx.Frame.__init__(self, None, wx.ID_ANY,
                          "File and Folder Dialogs Tutorial")
        panel = wx.Panel(self, wx.ID_ANY)
        self.colourData = None

        colorDlgBtn = wx.Button(panel, label="Open ColorDialog")
        colorDlgBtn.Bind(wx.EVT_BUTTON, self.onColorDlg)
        colorCubeBtn = wx.Button(panel, label="Open ColorCubeDialog")
        colorCubeBtn.Bind(wx.EVT_BUTTON, self.onCubeColorDialog)

        # put the buttons in a sizer
        sizer = wx.BoxSizer(wx.VERTICAL)
        sizer.Add(colorDlgBtn, 0, wx.ALL|wx.CENTER, 5)
        sizer.Add(colorCubeBtn, 0, wx.ALL|wx.CENTER, 5)
        panel.SetSizer(sizer)

    #----------------------------------------------------------------------
    def onColorDlg(self, event):
        """
        This is mostly from the wxPython Demo!
        """
        dlg = wx.ColourDialog(self)

        # Ensure the full colour dialog is displayed,
        # not the abbreviated version.
        dlg.GetColourData().SetChooseFull(True)

        if dlg.ShowModal() == wx.ID_OK:
            data = dlg.GetColourData()
            print 'You selected: %s\n' % str(data.GetColour().Get())

        dlg.Destroy()

    #----------------------------------------------------------------------
    def onCubeColorDialog(self, event):
        """
        This is mostly from the wxPython Demo!
        """
        self.colourData.SetColour(self.GetBackgroundColour())

        dlg = CCD.CubeColourDialog(self, self.colourData)

        if dlg.ShowModal() == wx.ID_OK:

            # If the user selected OK, then the dialog's wx.ColourData will
            # contain valid information. Fetch the data ...
            self.colourData = dlg.GetColourData()
            h, s, v, a = dlg.GetHSVAColour()

            # ... then do something with it. The actual colour data will be
            # returned as a three-tuple (r, g, b) in this particular case.
            colour = self.colourData.GetColour()
            self.SetBackgroundColour(self.colourData.GetColour())
            self.Refresh()

        dlg.Destroy()

#----------------------------------------------------------------------
# Run the program
if __name__ == "__main__":
    app = wx.App(False)
    frame = MyForm()
    frame.Show()
    app.MainLoop()
As you can see, the wx.ColourDialog is very easy to instantiate (see the onColorDlg method). All you need to do is call the dialog. The wxPython demo also included a line that showed how to display the full color version of the dialog, so we have included that line (and the comments) in this example: dlg.GetColourData().SetChooseFull(True). Finally, we call the dialog’s ShowModal method to show the dialog. To get the user’s color choice, we follow a two-step process. First we grab all color data using data = dlg.GetColourData(). Then to get the specific color, we call our data object’s GetColour().Get() methods.
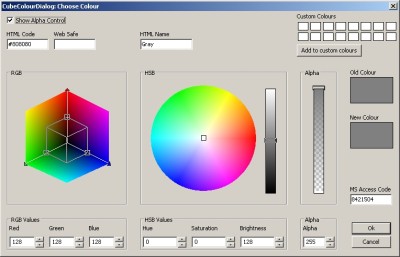
Now let’s look at what the CubeColourDialog looks like on Windows XP:
Note: You may receive an error related to setting the alpha if you are not using wxPython 2.8.11.0 or the SVN version of this widget.
The CubeColourDialog is written in pure python rather than being a C++ widget that’s been wrapped with SWIG. This makes the CubeColourDialog easier to edit and enhance. Let’s take a look at the code from the onCubeColorDialog method that we used above:
def onCubeColorDialog(self, event):
    """
    This is mostly from the wxPython Demo!
    """

    self.colourData.SetColour(self.GetBackgroundColour())

    dlg = CCD.CubeColourDialog(self, self.colourData)

    if dlg.ShowModal() == wx.ID_OK:

        # If the user selected OK, then the dialog's wx.ColourData will
        # contain valid information. Fetch the data ...
        self.colourData = dlg.GetColourData()
        h, s, v, a = dlg.GetHSVAColour()

        # ... then do something with it. The actual colour data will be
        # returned as a three-tuple (r, g, b) in this particular case.
        colour = self.colourData.GetColour()
        self.SetBackgroundColour(self.colourData.GetColour())
        self.Refresh()

    dlg.Destroy()
First off, we set the colourData variable to the parent widget’s background color. I’m not really sure why we do that, but I assume it’s because we want the dialog to match its parent’s color. Next create an instance of the dialog and show it. If the user presses the OK button, then we get the color that they chose. Note that we can get the hue, saturation, brightness, alpha components of the color chosen by calling the dialog’s GetHSVAColour method. We don’t actually use that information in this example, but it may be handy in your application. To actually get the color chosen, we just use the aptly named GetColour() method from our updated colourData instance. Finally, we set the background of our application to the newly chosen color. Neat, huh?
There’s also another pure python color chooser called the PyColourChooser. However, it’s not a self-contained dialog, so we won’t be covering it here.
Opening Files and Folders with wx.FileDialog, wx.DirDialog and MultiDirDialog (AGW)
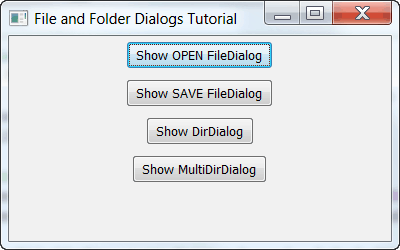
Opening files and folders with wxPython is a breeze! It includes wrappers for the native dialogs and also includes a pure python implementation for selecting multiple folders (i.e. directories) at the same time. Let’s take a look at the sample code first and then we’ll go over the specifics for each dialog.
import os
import wx
import wx.lib.agw.multidirdialog as MDD

wildcard = "Python source (*.py)|*.py|" \
            "All files (*.*)|*.*"

########################################################################
class MyForm(wx.Frame):

    #----------------------------------------------------------------------
    def __init__(self):
        wx.Frame.__init__(self, None, wx.ID_ANY,
                          "File and Folder Dialogs Tutorial")
        panel = wx.Panel(self, wx.ID_ANY)
        self.currentDirectory = os.getcwd()

        # create the buttons and bindings
        openFileDlgBtn = wx.Button(panel, label="Show OPEN FileDialog")
        openFileDlgBtn.Bind(wx.EVT_BUTTON, self.onOpenFile)

        saveFileDlgBtn = wx.Button(panel, label="Show SAVE FileDialog")
        saveFileDlgBtn.Bind(wx.EVT_BUTTON, self.onSaveFile)

        dirDlgBtn = wx.Button(panel, label="Show DirDialog")
        dirDlgBtn.Bind(wx.EVT_BUTTON, self.onDir)

        multiDirDlgBtn = wx.Button(panel, label="Show MultiDirDialog")
        multiDirDlgBtn.Bind(wx.EVT_BUTTON, self.onMultiDir)

        # put the buttons in a sizer
        sizer = wx.BoxSizer(wx.VERTICAL)
        sizer.Add(openFileDlgBtn, 0, wx.ALL|wx.CENTER, 5)
        sizer.Add(saveFileDlgBtn, 0, wx.ALL|wx.CENTER, 5)
        sizer.Add(dirDlgBtn, 0, wx.ALL|wx.CENTER, 5)
        sizer.Add(multiDirDlgBtn, 0, wx.ALL|wx.CENTER, 5)
        panel.SetSizer(sizer)

    #----------------------------------------------------------------------
    def onDir(self, event):
        """
        Show the DirDialog and print the user's choice to stdout
        """
        dlg = wx.DirDialog(self, "Choose a directory:",
                           style=wx.DD_DEFAULT_STYLE
                           #| wx.DD_DIR_MUST_EXIST
                           #| wx.DD_CHANGE_DIR
                           )
        if dlg.ShowModal() == wx.ID_OK:
            print "You chose %s" % dlg.GetPath()
        dlg.Destroy()

    #----------------------------------------------------------------------
    def onMultiDir(self, event):
        """
        Create and show the MultiDirDialog
        """
        dlg = MDD.MultiDirDialog(self, title="Choose a directory:",
                                 defaultPath=self.currentDirectory,
                                 agwStyle=0)
        if dlg.ShowModal() == wx.ID_OK:
            paths = dlg.GetPaths()
            print "You chose the following file(s):"
            for path in paths:
                print path
        dlg.Destroy()

    #----------------------------------------------------------------------
    def onOpenFile(self, event):
        """
        Create and show the Open FileDialog
        """
        dlg = wx.FileDialog(
            self, message="Choose a file",
            defaultDir=self.currentDirectory,
            defaultFile="",
            wildcard=wildcard,
            style=wx.FD_OPEN | wx.FD_MULTIPLE | wx.FD_CHANGE_DIR
            )
        if dlg.ShowModal() == wx.ID_OK:
            paths = dlg.GetPaths()
            print "You chose the following file(s):"
            for path in paths:
                print path
        dlg.Destroy()

    #----------------------------------------------------------------------
    def onSaveFile(self, event):
        """
        Create and show the Save FileDialog
        """
        dlg = wx.FileDialog(
            self, message="Save file as ...",
            defaultDir=self.currentDirectory,
            defaultFile="", wildcard=wildcard, style=wx.FD_SAVE
            )
        if dlg.ShowModal() == wx.ID_OK:
            path = dlg.GetPath()
            print "You chose the following filename: %s" % path
        dlg.Destroy()

#----------------------------------------------------------------------
# Run the program
if __name__ == "__main__":
    app = wx.App(False)
    frame = MyForm()
    frame.Show()
    app.MainLoop()
Opening and Saving File Dialogs
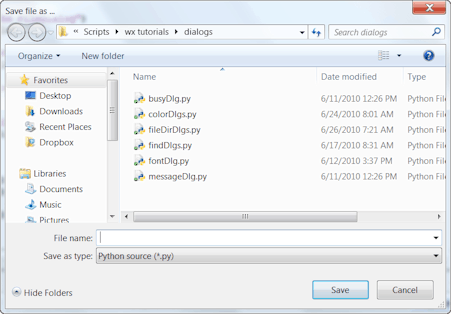
The wx.FileDialog has two versions: The open and the save file version. The open version is above and the save version is below:
Let’s take a look at the code for each of these:
def onOpenFile(self, event):
    """
    Create and show the Open FileDialog
    """
    dlg = wx.FileDialog(
        self, message="Choose a file",
        defaultDir=self.currentDirectory,
        defaultFile="",
        wildcard=wildcard,
        style=wx.FD_OPEN | wx.FD_MULTIPLE | wx.FD_CHANGE_DIR
        )
    if dlg.ShowModal() == wx.ID_OK:
        paths = dlg.GetPaths()
        print "You chose the following file(s):"
        for path in paths:
            print path
    dlg.Destroy()

#----------------------------------------------------------------------
def onSaveFile(self, event):
    """
    Create and show the Save FileDialog
    """
    dlg = wx.FileDialog(
        self, message="Save file as ...",
        defaultDir=self.currentDirectory,
        defaultFile="", wildcard=wildcard, style=wx.FD_SAVE
        )
    if dlg.ShowModal() == wx.ID_OK:
        path = dlg.GetPath()
        print "You chose the following filename: %s" % path
    dlg.Destroy()
The onOpenFile method shows how to create the open version. You can set the dialog’s title, what directory the dialog will open in, what files it will show, the default file chosen, whether or not you can choose multiple files (the wx.MULTIPLE flag) and whether or not you can change directories (via the CHANGE_DIR flag). In this example, we use the dialog’s GetPaths method to grab the one or more paths chosen by our user and then we print those choices to stdout.
The save version of the dialog is almost the same. The only difference is that we have changed the style to wx.SAVE.
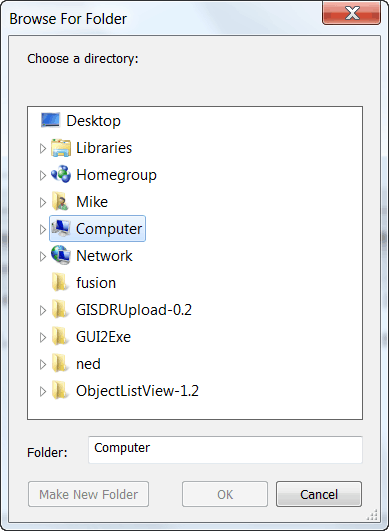
wx.DirDialog
The DirDialog is even easier to instantiate than the file dialogs! Here’s the simple code:
#----------------------------------------------------------------------
def onDir(self, event):
    """
    Show the DirDialog and print the user's choice to stdout
    """
    dlg = wx.DirDialog(self, "Choose a directory:",
                       style=wx.DD_DEFAULT_STYLE
                       #| wx.DD_DIR_MUST_EXIST
                       #| wx.DD_CHANGE_DIR
                       )
    if dlg.ShowModal() == wx.ID_OK:
        print "You chose %s" % dlg.GetPath()
    dlg.Destroy()
We can only change a few items with this dialog: the title, whether or not the directory must already exist and whether or not the user can change directories. You can also set the default directory that it starts in via the defaultPath parameter.
The MultiDirDialog (AGW)
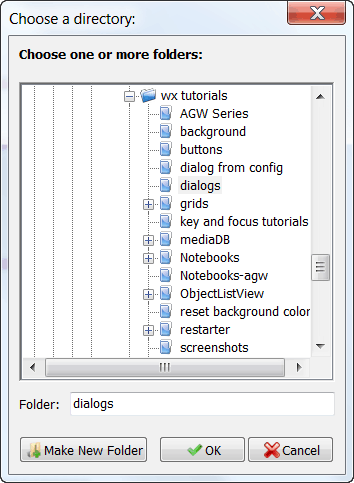
The MultiDirDialog from the AGW library is a pure python implementation of the wx.DirDialog, but with more features. It allows the user to choose multiple directories at once, for example. Here’s a simple example of how to use it:
def onMultiDir(self, event):
    """
    Create and show the MultiDirDialog
    """
    dlg = MDD.MultiDirDialog(self, title="Choose a directory:",
                             defaultPath=self.currentDirectory,
                             agwStyle=0)
    if dlg.ShowModal() == wx.ID_OK:
        paths = dlg.GetPaths()
        print "You chose the following file(s):"
        for path in paths:
            print path
    dlg.Destroy()
While this code doesn’t show it, you can also set whether or not you want to allow the user to create a new directory. Other than that and the special agwStyle flag, there’s not much different about this dialog. Still, it’s handy to have since it’s written in python and you can enhance it much easier than you could the wx.DirDialog version.
wx.FontDialog
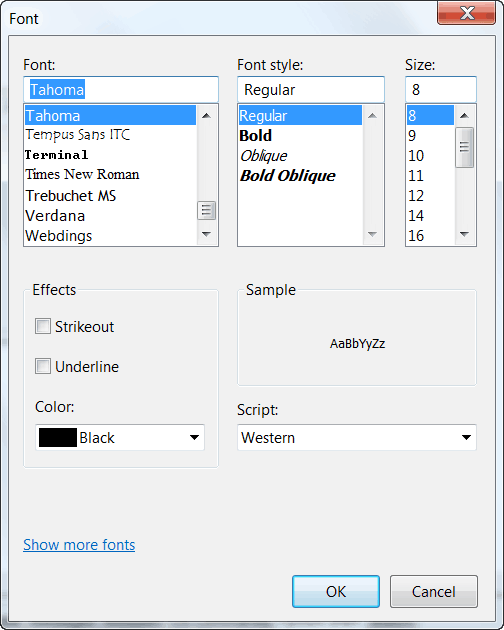
The FontDialog gives the user the ability to choose a font. For this example, we’ll use a slightly modified version of code from the wxPython demo itself:
import wx
from wx.lib import stattext

#---------------------------------------------------------------------------

class TestPanel(wx.Panel):
    def __init__(self, parent):
        wx.Panel.__init__(self, parent, -1)

        btn = wx.Button(self, -1, "Select Font")
        self.Bind(wx.EVT_BUTTON, self.OnSelectFont, btn)

        self.sampleText = stattext.GenStaticText(self, -1, "Sample Text")
        self.sampleText.SetBackgroundColour(wx.WHITE)

        self.curFont = self.sampleText.GetFont()
        self.curClr = wx.BLACK

        fgs = wx.FlexGridSizer(cols=2, vgap=5, hgap=5)
        fgs.AddGrowableCol(1)
        fgs.AddGrowableRow(0)

        fgs.Add(btn)
        fgs.Add(self.sampleText, 0, wx.ADJUST_MINSIZE|wx.GROW)

        fgs.Add((15,15)); fgs.Add((15,15))   # an empty row

        fgs.Add(wx.StaticText(self, -1, "PointSize:"))
        self.ps = wx.StaticText(self, -1, "")
        font = self.ps.GetFont()
        font.SetWeight(wx.BOLD)
        self.ps.SetFont(font)
        fgs.Add(self.ps, 0, wx.ADJUST_MINSIZE)

        fgs.Add(wx.StaticText(self, -1, "Family:"))
        self.family = wx.StaticText(self, -1, "")
        self.family.SetFont(font)
        fgs.Add(self.family, 0, wx.ADJUST_MINSIZE)

        fgs.Add(wx.StaticText(self, -1, "Style:"))
        self.style = wx.StaticText(self, -1, "")
        self.style.SetFont(font)
        fgs.Add(self.style, 0, wx.ADJUST_MINSIZE)

        fgs.Add(wx.StaticText(self, -1, "Weight:"))
        self.weight = wx.StaticText(self, -1, "")
        self.weight.SetFont(font)
        fgs.Add(self.weight, 0, wx.ADJUST_MINSIZE)

        fgs.Add(wx.StaticText(self, -1, "Face:"))
        self.face = wx.StaticText(self, -1, "")
        self.face.SetFont(font)
        fgs.Add(self.face, 0, wx.ADJUST_MINSIZE)

        fgs.Add((15,15)); fgs.Add((15,15))   # an empty row

        fgs.Add(wx.StaticText(self, -1, "wx.NativeFontInfo:"))
        self.nfi = wx.StaticText(self, -1, "")
        self.nfi.SetFont(font)
        fgs.Add(self.nfi, 0, wx.ADJUST_MINSIZE)

        # give it some border space
        sizer = wx.BoxSizer(wx.VERTICAL)
        sizer.Add(fgs, 0, wx.GROW|wx.ADJUST_MINSIZE|wx.ALL, 25)

        self.SetSizer(sizer)
        self.UpdateUI()


    def UpdateUI(self):
        self.sampleText.SetFont(self.curFont)
        self.sampleText.SetForegroundColour(self.curClr)
        self.ps.SetLabel(str(self.curFont.GetPointSize()))
        self.family.SetLabel(self.curFont.GetFamilyString())
        self.style.SetLabel(self.curFont.GetStyleString())
        self.weight.SetLabel(self.curFont.GetWeightString())
        self.face.SetLabel(self.curFont.GetFaceName())
        self.nfi.SetLabel(self.curFont.GetNativeFontInfo().ToString())
        self.Layout()


    def OnSelectFont(self, evt):
        data = wx.FontData()
        data.EnableEffects(True)
        data.SetColour(self.curClr)         # set colour
        data.SetInitialFont(self.curFont)

        dlg = wx.FontDialog(self, data)

        if dlg.ShowModal() == wx.ID_OK:
            data = dlg.GetFontData()
            font = data.GetChosenFont()
            colour = data.GetColour()

            self.curFont = font
            self.curClr = colour
            self.UpdateUI()

        # Don't destroy the dialog until you get everything you need from the
        # dialog!
        dlg.Destroy()


########################################################################
class MyForm(wx.Frame):

    #----------------------------------------------------------------------
    def __init__(self):
        wx.Frame.__init__(self, None, wx.ID_ANY,
                          "wx.FontDialog Tutorial")
        panel = TestPanel(self)

#----------------------------------------------------------------------
# Run the program
if __name__ == "__main__":
    app = wx.App(False)
    frame = MyForm()
    frame.Show()
    app.MainLoop()
In this example, we create and show the dialog in the OnSelectFont method. For reasons I don’t fully understand, we create a font data object right off the bat and set various attributes for it. Then if the user chooses a font and hits the OK button, we dump those settings and create new ones based on the user’s choice. We extract the font and color data from the user chosen font and set some class attributes. Next we call the UpdateUI method. This will update our GenStaticText to show the chosen font. Feel free to look at how that’s accomplished in the UpdateUI method.
wx.MessageDialog
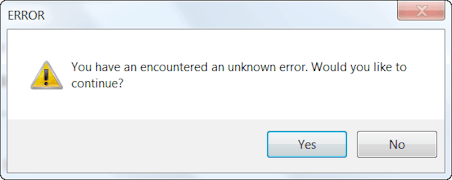
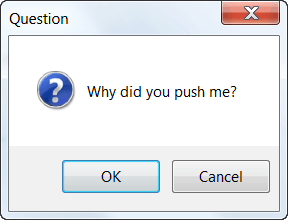
The wx.MessageDialog is used to give the user some sort of message or to ask a simple question. Here are a few example screenshots:
Now let’s take a quick look at how we can create these dialogs!
# http://www.wxpython.org/docs/api/wx.MessageDialog-class.html

import wx

########################################################################
class MyForm(wx.Frame):

    #----------------------------------------------------------------------
    def __init__(self):
        wx.Frame.__init__(self, None, wx.ID_ANY,
                          "MessageDialog Tutorial")
        self.panel = wx.Panel(self, wx.ID_ANY)

        sizer = wx.BoxSizer(wx.VERTICAL)
        buttons = [("Exclamation", self.onExclamation),
                   ("Information", self.onInfo),
                   ("Question", self.onQuestion)
                   ]
        for label, handler in buttons:
            self.createAndLayoutButtons(label, handler, sizer)
        self.panel.SetSizer(sizer)

    #----------------------------------------------------------------------
    def createAndLayoutButtons(self, label, handler, sizer):
        """"""
        button = wx.Button(self.panel, label=label)
        button.Bind(wx.EVT_BUTTON, handler)
        sizer.Add(button, 0, wx.ALL|wx.CENTER, 5)

    #----------------------------------------------------------------------
    def onExclamation(self, event):
        """"""
        msg = "You have an encountered an unknown error. Would you like to continue?"
        self.showMessageDlg(msg, "ERROR",
                            wx.YES_NO|wx.YES_DEFAULT|wx.ICON_EXCLAMATION)

    #----------------------------------------------------------------------
    def onInfo(self, event):
        """
        This method is fired when its corresponding button is pressed
        """
        self.showMessageDlg("This is for informational purposes only!",
                            "Information", wx.OK|wx.ICON_INFORMATION)

    #----------------------------------------------------------------------
    def onQuestion(self, event):
        """"""
        self.showMessageDlg("Why did you push me?", "Question",
                            wx.OK|wx.CANCEL|wx.ICON_QUESTION)

    #----------------------------------------------------------------------
    def showMessageDlg(self, msg, title, style):
        """"""
        dlg = wx.MessageDialog(parent=None, message=msg,
                               caption=title, style=style)
        dlg.ShowModal()
        dlg.Destroy()

# Run the program
if __name__ == "__main__":
    app = wx.App(False)
    frame = MyForm()
    frame.Show()
    app.MainLoop()
If you look at the example above you’ll quickly notice that we can change the appearance of the MessageDialog using only style flags:
- wx.YES_NO gives the dialog a Yes and a No button
- wx.OK gives us just an OK button
- wx.OK|wx.CANCEL creates both an OK and a Cancel button
- wx.ICON_EXCLAMATION puts a yellow triangle icon in our dialog
- wx.ICON_INFORMATION creates a round blue icon
- wx.ICON_QUESTION gives us a question mark icon
There are several more flags we could use listed in the documentation, but they’re mostly redundant. Feel free to read up on them though.
Wrapping Up
We’ve covered a lot of ground in this article. You now know how to create about half the provided standard dialogs that are included with wxPython. We’ll look at the other half in the second part of this article. In the meantime, I hope you have found this enlightening. Feel free to ask questions in the comments!
Note: This code was tested on the following:
- Windows XP Professional, wxPython 2.8.10.1 / 2.8.11.0, Python 2.5
- Windows 7 Home Edition, wxPython 2.8.10.1, Python 2.6
If you want to see the second part of this article, click here
Additional Reading
- wx.BusyInfo documentation or see the wiki page
- wx.ColourDialog documentation
- CubeColourDialog (AGW) documentation (also see Gavana’s docs)
- PyColourChooser documentation
- wx.DirDialog and MultiDirDialog (AGW)
- wx.FileDialog documentation
- wx.FontDialog documentation
- wx.MessageDialog documentation




Thanks for writing about the BusyInfo dialog! I didn't know about it and it sounds useful!
I do find it a bit odd to set something to None. Generally I explicitly delete:
del instance
Nice post, by the way. Stumbled on it on Planet Python.