Machine Learning, artificial intelligence and face recognition are big topics right now. So I thought it would be fun to see how easy it is to use Python to detect faces in photos. This article will focus on just detecting faces, not face recognition which is actually assigning a name to a face. The most popular and probably the simplest way to detect faces using Python is by using the OpenCV package. OpenCV is a computer vision library that’s written in C++ and had Python bindings. It can be kind of complicated to install depending on which OS you are using, but for the most part you can just use pip:
pip install opencv-python
I have had issues with OpenCV on older versions of Linux where I just can’t get the newest version to install correctly. But this works fine on Windows and seems to work okay for the latest versions of Linux right now. For this article, I am using the 3.4.2 version of OpenCV’s Python bindings.
Finding Faces
There are basically two primary ways to find faces using OpenCV:
- Haar Classifier
- LBP Cascade Classifier
Most tutorials use Haar because it is more accurate, but it is also much slower than LBP. I am going to stick with Haar for this tutorial. The OpenCV package actually has all the data you need to use Harr effectively. Basically you just need an XML file with the right face data in it. You could create your own if you knew what you were doing or you can just use what comes with OpenCV. I am not a data scientist, so I will be using the built-in classifier. In this case, you can find it in your OpenCV library that you installed. Just go to the /Lib/site-packages/cv2/data folder in your Python installation and look for the haarcascade_frontalface_alt.xml. I copied that file out and put it in the same folder I wrote my face detection code in.
Haar works by looking at a series of positive and negative images. Basically someone went and tagged the features in a bunch of photos as either relevant or not and then ran it through a machine learning algorithm or a neural network. Haar looks at edge, line and four-rectangle features. There’s a pretty good explanation over on the OpenCV site. Once you have the data, you don’t need to do any further training unless you need to refine your detection algorithm.
Now that we have the preliminaries out of the way, let’s write some code:
import cv2
import os

def find_faces(image_path):
    image = cv2.imread(image_path)

    # Make a copy to prevent us from modifying the original
    color_img = image.copy()

    filename = os.path.basename(image_path)

    # OpenCV works best with gray images
    gray_img = cv2.cvtColor(color_img, cv2.COLOR_BGR2GRAY)

    # Use OpenCV's built-in Haar classifier
    haar_classifier = cv2.CascadeClassifier('haarcascade_frontalface_alt.xml')

    faces = haar_classifier.detectMultiScale(gray_img, scaleFactor=1.1, minNeighbors=5)
    print('Number of faces found: {faces}'.format(faces=len(faces)))

    for (x, y, width, height) in faces:
        cv2.rectangle(color_img, (x, y), (x+width, y+height), (0, 255, 0), 2)

    # Show the faces found
    cv2.imshow(filename, color_img)
    cv2.waitKey(0)
    cv2.destroyAllWindows()

if __name__ == '__main__':
    find_faces('headshot.jpg')
The first thing we do here are our imports. The OpenCV bindings are called cv2 in Python. Then we create a function that accepts a path to an image file. We use OpenCV’s imread method to read the image file and then we create a copy of it to prevent us from accidentally modifying the original image. Next we convert the image to gray scale. You will find that computer vision almost always works better with gray than it does in color or at least that is the case with OpenCV.
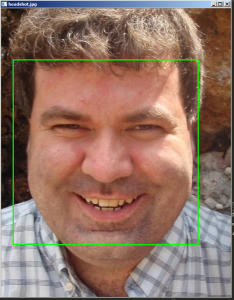
The next step is to load up the Haar classifier using OpenCV’s XML file. Now we can attempt to find faces in our image using the classifier object’s detectMultiScale method. I print out the number of faces that we found, if any. The classifier object actually returns an iterator of tuples. Each tuple contains the x/y coordinates of the face it found as well as width and height of the face. We use this information to draw a rectangle around the face that was found using OpenCV’s rectangle method. Finally we show the result:

That worked pretty well with a photo of myself looking directly at the camera. Just for fun, let’s try running this royalty free image I found through our code:

When I ran this image in the code, I ended up with the following:

As you can see, OpenCV only found two of the four faces, so that particular cascades file isn’t good enough for finding all the faces in the photo.
Finding Eyes in Photos
OpenCV also has a Haar Cascade eye XML file for finding the eyes in photos. If you do a lot of photography, you probably know that when you do portraiture, you want to try to focus on the eyes. In fact, some cameras even have an eye autofocus capability. For example, I know Sony has been bragging about their eye focus function for a couple of years now and it actually works pretty well in my tests of one of their cameras. It is likely using something like Haars itself to find the eye in real time.
Anyway, we need to modify our code a bit to make an eye finder script:
import cv2
import os

def find_faces(image_path):
    image = cv2.imread(image_path)

    # Make a copy to prevent us from modifying the original
    color_img = image.copy()

    filename = os.path.basename(image_path)

    # OpenCV works best with gray images
    gray_img = cv2.cvtColor(color_img, cv2.COLOR_BGR2GRAY)

    # Use OpenCV's built-in Haar classifier
    haar_classifier = cv2.CascadeClassifier('haarcascade_frontalface_alt.xml')
    eye_cascade = cv2.CascadeClassifier('haarcascade_eye.xml')

    faces = haar_classifier.detectMultiScale(gray_img, scaleFactor=1.1, minNeighbors=5)
    print('Number of faces found: {faces}'.format(faces=len(faces)))

    for (x, y, width, height) in faces:
        cv2.rectangle(color_img, (x, y), (x+width, y+height), (0, 255, 0), 2)
        roi_gray = gray_img[y:y+height, x:x+width]
        roi_color = color_img[y:y+height, x:x+width]
        eyes = eye_cascade.detectMultiScale(roi_gray)
        for (ex,ey,ew,eh) in eyes:
            cv2.rectangle(roi_color,(ex,ey),(ex+ew,ey+eh),(0,255,0),2)

    # Show the faces / eyes found
    cv2.imshow(filename, color_img)
    cv2.waitKey(0)
    cv2.destroyAllWindows()

if __name__ == '__main__':
    find_faces('headshot.jpg')
Here we add a second cascade classifier object. This time around, we use OpenCV’s built-in haarcascade_eye.xml file. The other change is in our loop where we loop over the faces found. Here we also attempt to find the eyes and loop over them while drawing rectangles around them. I tried running my original headshot image through this new example and got the following:

This did a pretty good job, although it didn’t draw the rectangle that well around the eye on the right.
Wrapping Up
OpenCV has lots of power to get you started doing computer vision with Python. You don’t need to write very many lines of code to create something useful. Of course, you may need to do a lot more work than is shown in this tutorial training your data and refining your dataset to make this kind of code work properly. My understanding is that the training portion is the really time consuming part. Anyway, I highly recommend checking out OpenCV and giving it a try. It’s a really neat library with decent documentation.
Related Reading
- OpenCV – Face Detection using Haar Cascades
- Face Recognition with Python
- DataScienceGo – OpenCV Face Detection
