Most applications come with the Status Bar. The status bar is the widget along the bottom of most applications that you use every day. They give you information about what line you’re editing in a text editor or when you last saved. In wxPython, you can add a status bar to your frame by using the wx.StatusBar class. In this article, we will learn all about how to use status bars in wxPython.
No Status Bars
It’s always good to start at the beginning. So we will begin our journey by looking at some sample code that shows what a frame looks like without a status bar:
import wx

class MainFrame(wx.Frame):

    def __init__(self):
        wx.Frame.__init__(self, None, title='No Statusbars')

        panel = wx.Panel(self)

        self.Show()

if __name__ == '__main__':
    app = wx.App(False)
    frame = MainFrame()
    app.MainLoop()
When you run this code, you should see something like the following:
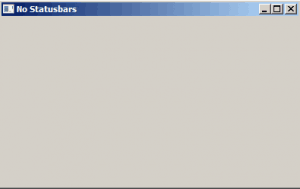
Well that was pretty simple. Let’s find out how to add a status bar!
Adding a Status Bar
Of course not adding something was pretty simple. But you will soon find that adding a simple one-field status bar is also really easy in wxPython. In fact, it’s really just a one line change! However to make it a bit more interesting, we will also set the status bar’s text to something too. Let’s take a look:
import wx

class MainFrame(wx.Frame):

    def __init__(self):
        wx.Frame.__init__(self, None, title='')
        panel = wx.Panel(self)

        self.statusbar = self.CreateStatusBar(1)
        self.statusbar.SetStatusText('This goes in your statusbar')

        self.Show()

if __name__ == '__main__':
    app = wx.App(False)
    frame = MainFrame()
    app.MainLoop()
I am going to run this code on Windows 7 as I think Windows has one of the easiest to see status bars. When you run it, you should see something similar to this:

You will notice that when we created the status bar, we had to call the frame’s CreateStatusBar() method. The parameter we passed in told the status bar that we only wanted one field in the status bar.
Creating a Multi-Field Status Bar
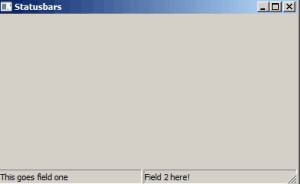
A lot of applications can display multiple pieces of information to the user in the application’s status bar. Microsoft’s Word is a good example as it will list out page information, word count and more in separate sections of the status bar. You can show this kind of thing withc wxPython too. Let’s see an example:
import wx


class MainFrame(wx.Frame):

    def __init__(self):
        wx.Frame.__init__(self, None, title='Statusbars')
        panel = wx.Panel(self)

        self.statusbar = self.CreateStatusBar(2)
        self.statusbar.SetStatusText('This goes field one')
        self.statusbar.SetStatusText('Field 2 here!', 1)

        self.Show()

if __name__ == '__main__':
    app = wx.App(False)
    frame = MainFrame()
    app.MainLoop()
In this example, we pass the number two to CreateStatusBar to create two equally sized sections in our status bar. Then we call SetStatusText(). You will note that the first call doesn’t specify which section to put its text. That’s because the default is zero. To put text in a field other than zero, we need to be more explicit. Thus in the second call to SetStatusText() we pass it a one (1) which tells wxPython to put the text in the second section of the status bar.
Changing Section Widths
You can specify the section widths via the status bar’s SetStatusWidths() method, which accepts a Python list. You can either set fixed width or variable widths in your status bar. For fixed, you just pass a Python list of integers where each integer represents the field’s size in pixels. If you’d rather do a variable width, then you will use a list that contains negative numbers. For example, if you had [-2, -1], the first field would take up 66% of the space while the second took up the remaining 33%. You can also mix fixed and variable, like this: [-2, -1, 50]. In this case, you are telling wxPython to take up 66% of the remaining space in the first field, 33% of the remaining space in the second field and 50 pixels in the 3rd field.
This may be easier to see visually, so let’s look at an example!
import wx


class MainFrame(wx.Frame):

    def __init__(self):
        wx.Frame.__init__(self, None, title='Statusbars')
        panel = wx.Panel(self)

        self.statusbar = self.CreateStatusBar(2)
        self.statusbar.SetStatusWidths([100, 300])
        self.statusbar.SetStatusText('This goes field one')
        self.statusbar.SetStatusText('Field 2 here!', 1)

        self.Show()

if __name__ == '__main__':
    app = wx.App(False)
    frame = MainFrame()
    app.MainLoop()
In this example, we want our first field to be 100 pixels wide with the second field being 300 pixels. When you run the code, you should see something like this:
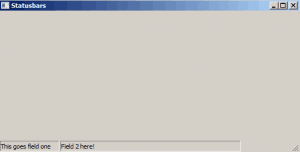
Note that I resized the window to demonstrate that when the frame is wider then 400 pixels, the status bar looks kind of weird. This is a common problem when using fixed widths. You will have similar problems if you use absolute positioning of widgets instead of using sizers. Let’s see if we can fix the issue by using a mix of fixed width and variable widths. Here’s the change to the code:
import wx


class MainFrame(wx.Frame):

    def __init__(self):
        wx.Frame.__init__(self, None, title='Statusbars')
        panel = wx.Panel(self)

        self.statusbar = self.CreateStatusBar(2)
        self.statusbar.SetStatusWidths([100, -1])
        self.statusbar.SetStatusText('This goes field one')
        self.statusbar.SetStatusText('Field 2 here!', 1)

        self.Show()

if __name__ == '__main__':
    app = wx.App(False)
    frame = MainFrame()
    app.MainLoop()
You will note that we replaced the 300 pixels with a -1, which means the second field should take up all the space following the first 100 pixels. Here’s a screenshot:
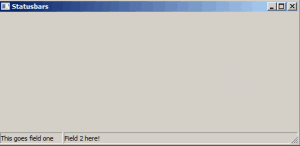
This time the status bar doesn’t look so odd. You can resize the status bar as wide as you want now.
Getting the Status
You can also get the status bar’s status using the StatusBar’s GetStatusText() method. Let’s take a look:
import wx


class MainFrame(wx.Frame):

    def __init__(self):
        wx.Frame.__init__(self, None, title='Statusbars')
        panel = wx.Panel(self)

        status_btn = wx.Button(panel, label='Get Status')
        status_btn.Bind(wx.EVT_BUTTON, self.on_status)

        self.statusbar = self.CreateStatusBar(2)
        self.statusbar.SetStatusText('This goes in field one')
        self.statusbar.SetStatusText('Field 2 here!', 1)

        self.Show()

    def on_status(self, event):
        print self.statusbar.GetStatusText()
        print self.statusbar.GetStatusText(1)

if __name__ == '__main__':
    app = wx.App(False)
    frame = MainFrame()
    app.MainLoop()
You will note that to get the second field’s text, we had to tell GetStatusText explicitly by passing it a one.
Changing the Status Text
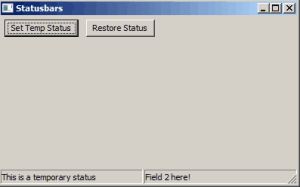
We’ve already looked at changing the status bar’s text with SetStatusText(). However, there are two more methods worth looking at: PushStatusText() and PopStatusText(). These use a stack so that when you call PushStatusText(), it puts the current status into memory on a stack and displays the string that you passed to it. When you call PopStatusText(), it will restore the previously stored text. However if you call SetStatusText() between the push and the pop, then the memory will be erased and pop will not restore the status string.
Let’s look at an example:
import wx


class MainFrame(wx.Frame):

    def __init__(self):
        wx.Frame.__init__(self, None, title='Statusbars')
        panel = wx.Panel(self)

        status_btn = wx.Button(panel, label='Set Temp Status')
        status_btn.Bind(wx.EVT_BUTTON, self.set_temp_status)

        restore_btn = wx.Button(panel, label='Restore Status')
        restore_btn.Bind(wx.EVT_BUTTON, self.restore_status)

        sizer = wx.BoxSizer(wx.HORIZONTAL)
        sizer.Add(status_btn, 0, wx.ALL, 5)
        sizer.Add(restore_btn, 0, wx.ALL, 5)
        panel.SetSizer(sizer)

        self.statusbar = self.CreateStatusBar(2)
        self.statusbar.SetStatusText('This goes in field one')
        self.statusbar.SetStatusText('Field 2 here!', 1)

        self.Show()

    def set_temp_status(self, event):
        self.statusbar.PushStatusText('This is a temporary status')

    def restore_status(self, event):
        self.statusbar.PopStatusText()

if __name__ == '__main__':
    app = wx.App(False)
    frame = MainFrame()
    app.MainLoop()
Note that PushStatusText() and PopStatusText() default to pushing and popping the first field. You will need to specify a different field to push and pop if you need to do that. Give this code a try and see what happens!
Wrapping Up
This article covered a lot of material. You learned how to create a StatusBar widget for your Frame. You learned how to split up the status bar into multiple fields of multiple widths. You also learned how to get the text from it and change the text too. I will also note that when you create a menubar, you can set each menu with a string that will show up in the status bar (if you have one) when you mouse over the menu item. I will leave that as an exercise for the reader to try though.
Related Reading
- wxPython documentation on the StatusBar class
- wxPython: All about menus
- wxPython: Working with Menus, Toolbars and Accelerators
